English
 русский
 Español
 عربى
عربى

Content
- 1 Understanding Hydraulic Pump Diagrams
- 2 Common Hydraulic Pump Diagram Symbols
- 3 Gear Pump Diagram Components
- 4 Vane Pump Diagram Structure
- 5 Piston Pump Diagram Variations
- 6 Reading Flow Path Diagrams
- 7 Interpreting Performance Curves on Diagrams
- 8 Control and Compensation Diagrams
- 9 Troubleshooting with Pump Diagrams
- 10 Installation Guidance from Diagrams
- 11 Digital and 3D Pump Diagrams
Understanding Hydraulic Pump Diagrams
A hydraulic pump diagram is a technical schematic that illustrates how a hydraulic pump converts mechanical energy into hydraulic energy through visual representation of its internal components, fluid flow paths, and operational principles. These diagrams use standardized symbols defined by ISO 1219 and ANSI Y32.10 to show pumping chambers, inlet and outlet ports, rotating elements, and directional flow indicators. Understanding these diagrams is essential for system design, troubleshooting, maintenance, and selecting the appropriate pump for specific applications.
Hydraulic pump diagrams serve three primary purposes: they explain the fundamental operating mechanism of different pump types, provide installation and connection guidance showing port locations and rotation directions, and enable technicians to diagnose performance issues by understanding internal flow paths. Approximately 60% of hydraulic system failures relate to pump malfunction, making diagram literacy a critical skill for engineers and maintenance personnel.
Common Hydraulic Pump Diagram Symbols
Standardized symbols create a universal language for hydraulic schematics across manufacturers and countries. ISO 1219-1 establishes the international standard for hydraulic symbols, ensuring consistent interpretation regardless of language or regional conventions.
| Symbol Element | Representation | Meaning |
|---|---|---|
| Circle | Pump outline | Basic pump envelope or rotating group |
| Solid triangle | Inside circle | Fixed displacement pump |
| Diagonal arrow through triangle | Variable displacement indicator | Adjustable output volume pump |
| Arrows on flow lines | Direction indicators | Fluid flow direction through system |
| Dashed lines | Pilot or drain lines | Control signals or low-pressure returns |
| Semi-circle with line | Electric motor connection | Power source driving the pump |
Additional notation includes port designations where P indicates pressure outlet, T indicates tank return, and S indicates suction inlet. Rotation direction is shown by curved arrows, typically indicating clockwise or counterclockwise shaft rotation when viewed from the drive end.
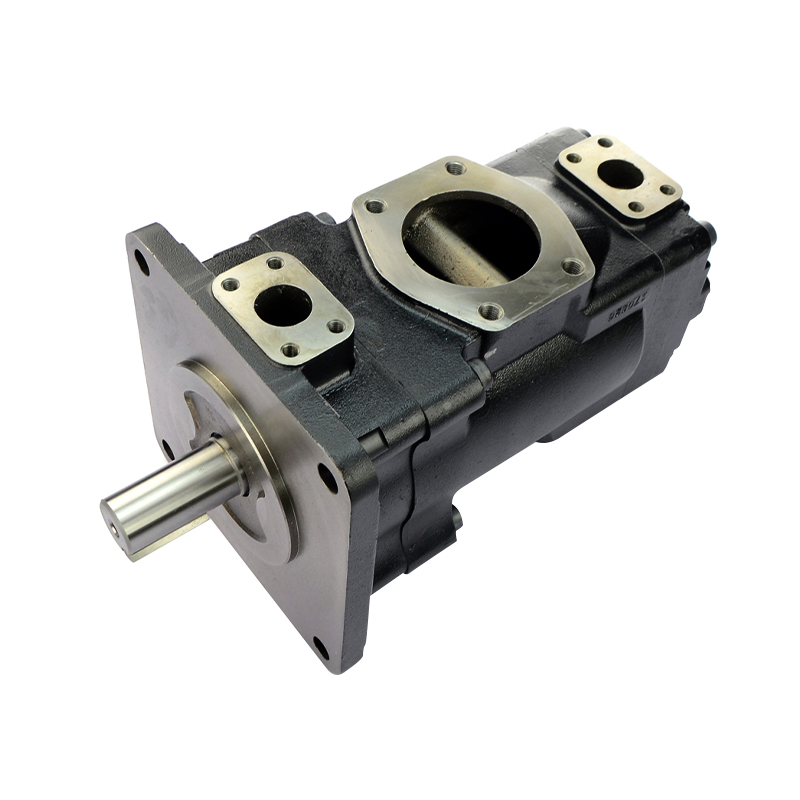
Gear Pump Diagram Components
Gear pumps are the most common fixed-displacement pumps, and their diagrams clearly illustrate the meshing gear mechanism. External gear pump diagrams show two identical gears rotating in opposite directions within a close-tolerance housing, creating suction at the inlet and pressure at the outlet through volume displacement.
Key Elements in Gear Pump Diagrams
- Drive gear connected to the motor shaft, shown with rotation direction arrow
- Driven gear (idler gear) meshing with drive gear on opposite side
- Inlet port positioned where gear teeth unmesh, creating expanding volume
- Outlet port located where teeth mesh together, forcing fluid out under pressure
- Crescent-shaped seal between inlet and outlet preventing backflow
- Housing cavity maintaining precise clearances of 0.0005-0.002 inches
Operating Principles Shown in Diagrams
Gear pump diagrams demonstrate displacement volumes calculated by the formula: Q = π × (D² - d²) × W × N / 4, where Q equals flow rate, D equals outer diameter, d equals root diameter, W equals gear width, and N equals rotational speed in RPM. Typical gear pumps achieve volumetric efficiencies of 90-95% at rated pressure, with diagrams showing how tight tolerances minimize internal leakage.
Internal gear pump diagrams differ by showing an external rotor with internal teeth rotating around a smaller internal gear. The crescent-shaped divider separates inlet from outlet, with this configuration producing smoother flow and 30% less pulsation compared to external gear designs.
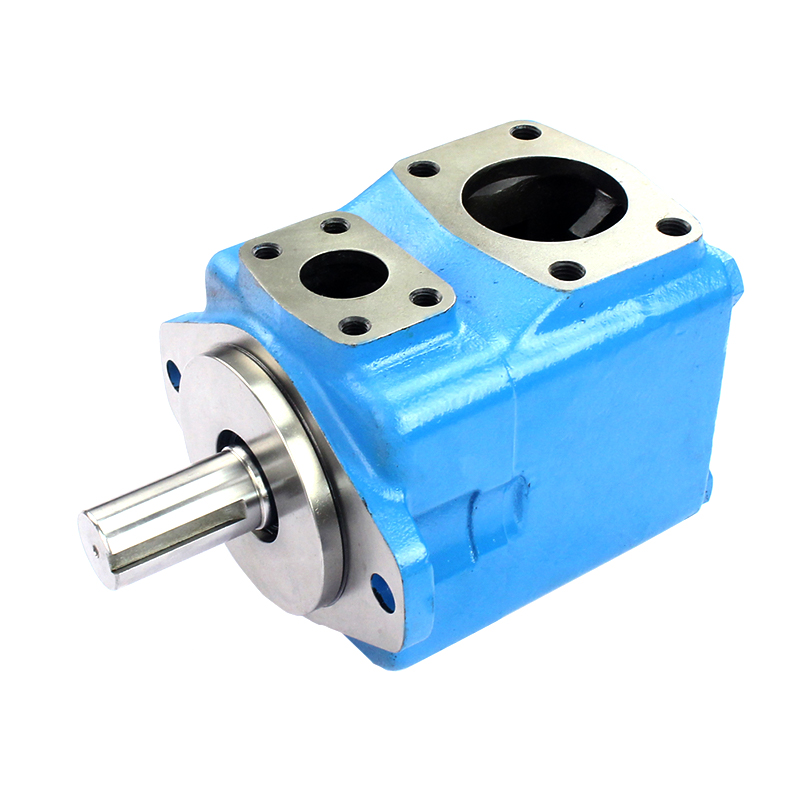
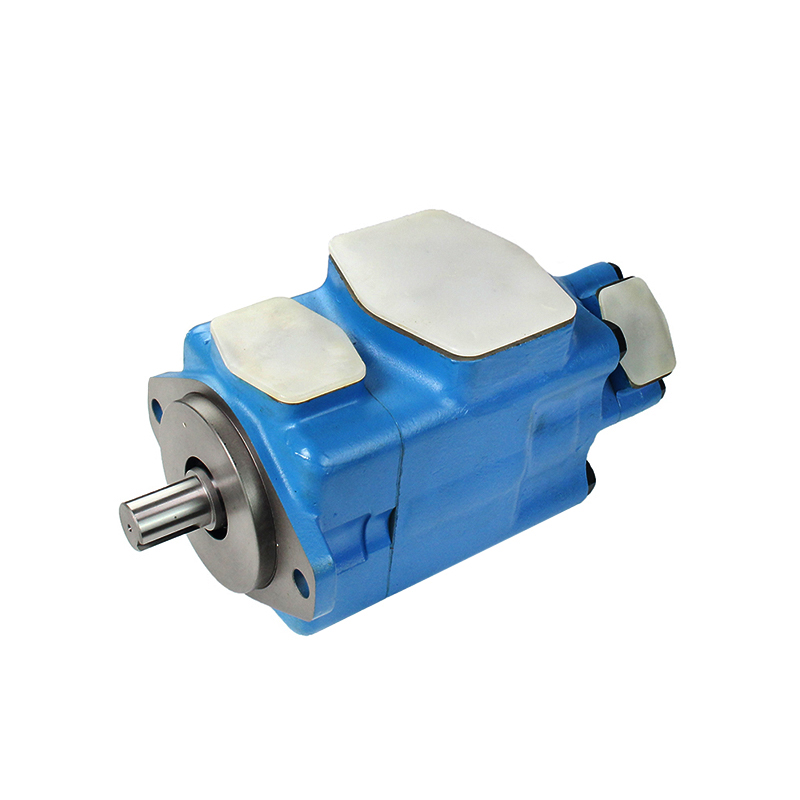
Vane Pump Diagram Structure
Vane pump diagrams illustrate a rotor with sliding vanes operating inside an elliptical cam ring. As the rotor spins, centrifugal force and inlet pressure push vanes outward against the cam ring, creating expanding and contracting chambers that draw in and expel hydraulic fluid.
Critical Components in Vane Pump Diagrams
- Rotor mounted eccentrically within the cam ring, offset by 2-10mm depending on displacement
- Vanes (typically 8-12 per rotor) sliding in radial slots with spring or pressure assistance
- Cam ring showing elliptical or circular profile determining displacement type
- Inlet and outlet kidney-shaped ports positioned at maximum and minimum chamber volumes
- Side plates sealing the pumping chambers with precision-machined surfaces
- Pressure balancing ports equalizing forces on rotor bearings
Fixed vs. Variable Displacement Vane Pump Diagrams
Fixed displacement vane pump diagrams show the cam ring in a permanent eccentric position. Variable displacement diagrams include adjustment mechanisms—either manual handwheel or pressure compensator—that move the cam ring to vary eccentricity from zero to maximum offset. At zero eccentricity (centered position), no fluid displacement occurs despite rotor rotation, providing efficient unloaded operation.
Balanced vane pump diagrams display two inlet and two outlet ports positioned 180 degrees apart, eliminating side loading on shaft bearings. This configuration extends bearing life by 300-400% compared to unbalanced designs while maintaining quiet operation at speeds up to 1800 RPM.
Piston Pump Diagram Variations
Piston pump diagrams are more complex due to multiple reciprocating elements and sophisticated valve timing. These pumps achieve the highest pressure ratings (up to 10,000 PSI) and best efficiency (95-98%) among hydraulic pump types, making accurate diagram interpretation crucial for high-performance applications.
Axial Piston Pump Diagrams
Swashplate-type diagrams show pistons arranged parallel to the drive shaft, riding against an angled swashplate. The swashplate angle (typically 15-25 degrees) determines piston stroke length and pump displacement. As the cylinder barrel rotates, pistons reciprocate due to swashplate contact, creating suction and discharge strokes.
Key diagram elements include:
- Cylinder barrel rotating with drive shaft, containing 5-11 pistons
- Swashplate at fixed or variable angle with adjustment mechanism shown
- Valve plate with kidney-shaped inlet and outlet ports timed to piston position
- Piston slippers maintaining contact with swashplate through hydrostatic bearing film
- Return spring mechanisms ensuring slipper contact during low-pressure operation
Radial Piston Pump Diagrams
These diagrams show pistons arranged perpendicular to the drive shaft, operating inside a cam ring or over an eccentric shaft. Radial piston pumps excel in low-speed, high-torque applications with displacements reaching 1000 cc/rev. The diagram illustrates how cam profiles or eccentric rotation forces pistons inward and outward, with check valves or ported timing controlling inlet and outlet phases.
Reading Flow Path Diagrams
Understanding fluid flow through pump diagrams requires following the hydraulic circuit from reservoir to discharge. Proper flow path interpretation prevents installation errors that cause 40% of new system failures according to hydraulic industry data.
Inlet Side Characteristics
Diagrams show inlet connections with larger port sizes to minimize suction resistance. Inlet velocity should not exceed 4 feet per second to prevent cavitation, represented in diagrams by generous port sizing and often including inlet strainers or filters shown upstream of the pump symbol. Suction lift capabilities appear in technical specifications accompanying the diagram, typically limited to 5-10 feet of head for standard pumps.
Discharge Side Features
Outlet ports shown in diagrams are smaller, designed for higher-velocity flow at system pressure. Discharge lines typically operate at 15-20 feet per second velocity to balance pressure drop against line size economics. Diagrams often include relief valve symbols connected to the discharge, protecting against overpressure conditions by directing flow back to tank when system pressure exceeds settings.
Case Drain Connections
Piston and some vane pump diagrams show separate case drain ports that return internal leakage to reservoir. Case drain flow typically represents 1-3% of pump output and must route to tank below fluid level to prevent cavitation. Diagrams indicate this with a dashed or lighter-weight line connecting to the tank symbol, sometimes including a back-pressure check valve to maintain minimum case pressure of 5-25 PSI.
Interpreting Performance Curves on Diagrams
Comprehensive pump diagrams include performance curves plotting relationships between pressure, flow, speed, efficiency, and power consumption. These graphical representations enable system designers to select optimal operating points and predict performance across varying conditions.
| Curve Type | X-Axis Parameter | Y-Axis Parameter | Key Information |
|---|---|---|---|
| Flow vs. Pressure | Pressure (PSI) | Flow Rate (GPM) | Volumetric efficiency degradation with pressure |
| Overall Efficiency | Pressure (PSI) | Efficiency (%) | Peak efficiency point and operating range |
| Power Required | Flow Rate (GPM) | Horsepower (HP) | Motor sizing requirements at various flows |
| Noise Level | RPM | Decibels (dB) | Acoustic performance for installation planning |
Peak efficiency typically occurs at 70-85% of maximum rated pressure, with efficiency dropping significantly at very low or maximum pressures. Designers use these curves to select pumps operating in the high-efficiency zone for the majority of duty cycles, reducing energy consumption by 15-25% compared to poorly matched selections.
Control and Compensation Diagrams
Variable displacement pump diagrams include control mechanisms that adjust output based on system demands. These sophisticated controls reduce energy consumption by up to 60% in systems with varying load cycles compared to fixed displacement pumps with throttling control.
Pressure Compensator Controls
Diagrams show pressure compensators as pilot-operated mechanisms that sense discharge pressure and reduce pump displacement when pressure reaches the compensator setting. Pressure compensators maintain system pressure within ±50 PSI of setpoint while flow varies from zero to maximum. The control piston or spool appears in diagrams connected by pilot lines to the pump discharge, with spring symbols indicating adjustment range typically spanning 500-3000 PSI.
Load Sensing Controls
More sophisticated diagrams include load sensing (LS) controls that adjust pump pressure to match actual load requirements plus a fixed margin. Load sensing systems reduce operating pressure by an average of 200-400 PSI compared to pressure compensated systems, significantly decreasing heat generation and energy consumption. Diagrams show LS signal lines connecting from directional control valves back to the pump compensator, with the pump maintaining pressure typically 150-300 PSI above the highest load signal.
Horsepower Limiting Controls
Advanced pump diagrams incorporate horsepower limiters that reduce displacement as pressure increases, maintaining constant input power. Torque limiting prevents motor stall and allows downsized prime movers, reducing equipment costs by 20-30%. The diagram shows the control characteristic as a hyperbolic curve where pressure × flow remains constant, implemented through mechanical linkages or electronic controls acting on the displacement adjustment mechanism.
Troubleshooting with Pump Diagrams
Diagrams serve as essential troubleshooting tools by identifying failure points and understanding symptom causes. Systematic diagnosis using pump diagrams reduces troubleshooting time by 50-70% compared to trial-and-error approaches.
Low Flow or Pressure Diagnosis
When systems experience reduced performance, diagrams help identify potential causes:
- Inlet restriction indicated by vacuum gauge readings exceeding diagram specifications (typically -5 to -10 inHg maximum)
- Internal wear allowing increased clearances between diagram-shown sealing surfaces
- Improper rotation direction contrary to shaft arrow shown on diagram
- Variable displacement stuck at minimum stroke position due to control malfunction
- Relief valve opening prematurely, shown in circuit diagram downstream of pump
Noise and Vibration Analysis
Cavitation produces distinctive rattling noise when inlet conditions fail to meet diagram specifications, typically caused by restricted inlet lines, low reservoir level, or excessive fluid viscosity. Diagrams showing recommended inlet line sizes and maximum suction lift help diagnose these conditions. Mechanical noise relates to worn bearings or damaged internal components identified through diagram cross-reference to replacement parts.
Overheating Issues
Pump case temperatures exceeding 180°F indicate efficiency problems traceable through diagram analysis. Each 1% efficiency loss generates approximately 40 BTU/minute of heat per input horsepower. Diagrams help identify whether overheating stems from mechanical friction (bearing problems, tight clearances) or volumetric losses (worn sealing surfaces, damaged internal components). Thermal imaging correlated with diagram component locations pinpoints specific failure areas.
Installation Guidance from Diagrams
Proper installation prevents premature failures and ensures rated performance. Installation diagrams provide critical mounting, alignment, and connection specifications that determine system longevity.
Mounting and Alignment Requirements
Diagrams specify mounting orientations, with many pumps requiring specific positions for proper lubrication. Shaft misalignment exceeding 0.003 inches reduces bearing life by 50% and increases seal wear. Installation diagrams show coupling selection, shimming procedures, and alignment tolerances critical for reliable operation. Some pumps allow any mounting orientation while others specifically require horizontal shaft positioning or limitations on inlet/outlet port orientation.
Piping Connection Details
Plumbing diagrams indicate proper port connections, required pipe sizing, and fitting types. Inlet lines should be 1-2 sizes larger than pump ports to maintain velocity under 4 ft/sec, while discharge lines match or slightly exceed port size. Diagrams show whether ports use SAE, NPT, or flange connections, along with torque specifications preventing leaks while avoiding port damage. Case drain requirements appear with specific routing instructions to ensure proper tank return below fluid level.
Initial Startup Procedures
Installation diagrams include priming instructions for first startup. Dry running for more than 10 seconds can cause catastrophic failure in most hydraulic pumps. Diagrams show fill port locations for pre-filling pump cases, recommended viscosity ranges for initial fluid (typically ISO VG 32-68), and break-in procedures for new pumps including limited pressure operation for the first 30-60 minutes of runtime.
Digital and 3D Pump Diagrams
Modern hydraulic documentation increasingly includes interactive digital diagrams and three-dimensional models. 3D CAD models integrated with technical specifications improve design accuracy by 40% and reduce installation errors by 35% according to engineering workflow studies.
Digital diagrams offer advantages over traditional 2D schematics including rotatable views showing component relationships from multiple angles, exploded assembly views illustrating disassembly sequences, and embedded hyperlinks connecting diagram elements to parts specifications, maintenance procedures, and ordering information. Augmented reality applications overlay digital diagrams onto physical pumps during maintenance, guiding technicians through service procedures with step-by-step visual instructions.
Computational fluid dynamics (CFD) animations demonstrate actual flow patterns through pump chambers, revealing efficiency losses from turbulence and recirculation not visible in static diagrams. These advanced visualization tools help engineers optimize designs and understand complex flow phenomena affecting performance and durability.